[Guide] Best Privacy Settings for Windows 10
UPDATE: Tutorial updated for the new Windows 10 November Update build 10586 (Threshold 2).Since when Windows 10 development started and free Insider Preview build released to public, there have been lots of talks about Windows 10 privacy policy, data collection and telemetry. Even after the final release of Windows 10 operating system, lots of people are still worried about their privacy in Windows 10. People think that Microsoft is collecting their personal data in Windows 10 OS which is absolutely wrong. Microsoft just collects some required basic data anonymously to improve Windows 10 functionality and suggestions which are given by the OS to the end user i.e. you.
If you are also worried about Windows 10 privacy issues and want to get maximum privacy in Windows 10, this topic will definitely help you. In this topic, we'll provide you a list of best privacy settings for Windows 10 which will allow you to disable automatic data collection and telemetry in Windows 10 and will help you in getting as much privacy as you can get in the OS. You'll be able to configure Windows 10 privacy settings quickly and easily with the help of this guide.
So without wasting time lets start our beginner's guide to Windows 10 privacy settings:
Actually Windows 10 allows you to configure lots of settings to improve your privacy at the time of Windows 10 installation as well as after installation. That's why we are dividing this tutorial in two parts:
- PART 1: Configure Windows 10 Privacy Settings at Installation Time
- PART 2: Configure Windows 10 Privacy Settings after Installation
If you are going to install Windows 10, then PART 1 will be very helpful to you. But if you have already installed Windows 10, you can skip to PART 2 to configure privacy settings.PART 1: Configure Windows 10 Privacy Settings at Installation Time
When you run Windows 10 setup, after a few minutes of installation the OOBE (Out-of-Box Experience) wizard starts to allow you customizing various settings related to Windows 10.
It contains 2 buttons: Use Express settings and Back. Most of the people click on "Use Express settings" button but they miss a tiny link "Customize settings" given at the bottom-left corner of screen. I wonder why Microsoft put that essential link there? They should have put the link near Express settings button to help users.

Anyway instead of clicking on Express settings button, click on Customize settings link so that you can configure various privacy settings at installation time.
After clicking on Customize settings link, you'll be provided with a screen where you can turn various privacy options on or off according to your requirements.
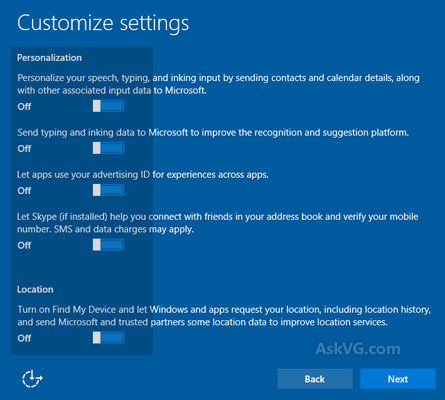
The first screen contains privacy options related to Personalization and Location. To maximize your privacy set all available options to Off:
- Personalize your speech, typing, and inking input by sending contacts and calendar details, along with other associated input data to Microsoft - OFF
- Send typing and inking data to Microsoft to improve the recognition and suggestion platform - OFF
- Let apps use your advertising ID for experiences across apps - OFF
- Let Skype (if installed) help you connect with friends in your address book and verify your mobile number. SMS and data charges may apply - OFF
- Turn on Find My Device and let Windows and apps request your location, including location history, and send Microsoft and trusted partners some location data to improve location services - OFF
Click on Next button and you'll be provided with another screen where you can customize privacy settings related to Connectivity and error reporting. For maximum privacy, you should set all options to Off:
- Automatically connect to suggested open hotspots. Not all networks are secure - OFF
- Automatically connect to networks shared by your contacts - OFF
- Automatically connect to hotspots temporarily to see if paid Wi-Fi services are available - OFF
- Send full error and diagnostic information to Microsoft - OFF

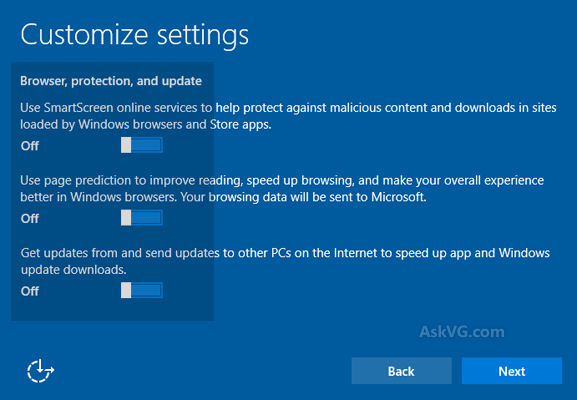
Again click on Next button and you'll be provided with another screen where you can customize privacy settings related to Web browser, protection and Windows update. For maximum privacy, you should set the first option to On and set remaining options to Off:
- Use SmartScreen online services to help protect against malicious content and downloads in sites loaded by Windows browsers and Store apps - ON
- Use page prediction to improve reading, speed up browsing, and make your overall experience better in Windows browsers. Your browsing data will be sent to Microsoft - OFF
- Get updates from and send updates to other PCs on the Internet to speed up app and Windows update downloads - OFF
Above are the all privacy settings which can be customized at Windows 10 installation time.
If you have installed Windows 10 but didn't customize above mentioned privacy settings at installation time and clicked on Express settings button, there is no need to worry.PART 2: Configure Windows 10 Privacy Settings after Installation
You can still configure those privacy settings along with many other settings using Settings app:
Open Start Menu and click on Settings option. It'll open Settings app. Alternatively, you can direct open Settings app using WIN+I hotkey.STEP 1:
Now click on "Privacy" section. Here you can tweak and customize several settings to improve your privacy in Windows 10.STEP 2:
For your convenience, we are providing an easy list which will tell you which option should be set to On and which should be set to Off:
General:
Leave the second option enabled and disable other remaining options:
- Let apps use my advertising ID for experiences across apps (turning this off will reset your ID) - OFF
- Turn on SmartScreen Filter to check web content (URLs) that Windows Store apps use - ON
- Send Microsoft info about how I write to help us improving typing and writing in the future - OFF
- Let websites provide locally relevant content by accessing my language list - OFF

Location:
If you don't use any app which requires your location, set the option "Location for this device" to OFF. Just click on Change button and turn the option off.

Also clear the location history by clicking on Clear button.
Camera, Microphone, Account info, Contacts, Calendar, Call history, Email, Messaging, Radios, Other devices:
Set sliders in all these sections to OFF for maximum privacy settings.

If you are using any app which requires these options (such as Mail app may require contacts, calendar details), leave that option enabled. Otherwise disable these options.
Speech, inking, & typing:
If you don't use Cortana (digital personal assistant), click on "Stop getting to know me" button to turn off the option.

Check out METHOD 3 in following tutorial to learn more about this option:
[Tip] Disable Cortana and Bing Search Results in Windows 10
Feedback & diagnostics:
If you want to help Microsoft in improving Windows 10 by providing your valuable feedback, you can set the option "Feedback Frequency" to Automatically, Always, Once a day or Once a week. If you don't want to provide feedback to Microsoft, you can set the option to Never.

Set "Diagnostic and usage data" option to Basic.
PS: Windows 10 Enterprise, Education, IoT and Server edition users can completely turn off the sending of diagnostic and usage data using Group Policy Editor. Type gpedit.msc in RUN or Start search box and press Enter. It'll open Group Policy Editor. Then go to:
Computer Configuration -> Administrative Templates -> Windows Components -> Data Collection and Preview BuildsIn right-side pane, double-click on "Allow Telemetry", select Enabled option and then set the value to "0 - Off/Security" from the drop-down list. Apply changes. On other Windows 10 editions such as Windows 10 Home (Core) or Pro edition, this method has no effects.
Background apps:
In this section, you can customize which apps can run in background to receive updates, info and send notifications.
Set all apps to Off to conserve power and improve privacy.

Now go back to Settings main page and click on "Network & Internet" section. Now select your Internet connection in Wi-Fi tab and click on Manage Wi-Fi settings link.STEP 3:
Now set the three options present in "Wi-Fi Sense" section to Off:
- Connect to suggested open hotspots - OFF
- Connect to networks shared by your contacts - OFF
- Get online when you're on the go by buying Wi-Fi. When turned on, Windows will temporarily connect to open hotspots that aren't secure to see if paid Wi-Fi is available - OFF

Again go back to Settings main page and click on "Update & security" section. Now in Windows Update tab, click on "Advanced options" link.STEP 4:
Again click on "Choose how updates are delivered" link and set the slider to Off given under "Updates from more than one place".

Check Step 6 in METHOD 1 of following tutorial to learn more about this option:
Fixing Windows 10 Automatic Updates Install Problem
Also disable telemetry options in Windows Defender tab as mentioned in following tutorial:STEP 5:
[Windows 10 Tip] Disable Data Collection and Telemetry in Windows Defender

Again go back to Settings main page and click on "System" section. Now in Notifications & actions tab, set "Show me tips about Windows" option to Off.STEP 6:

Again go back to Settings main page and click on "Personalization" section. Now in Lock screen tab, set "Get fun facts, tips, and more on your lock screen" option to Off.STEP 7:

Again in Start tab, set "Occasionally show suggestions in Start" option to Off.

You can also set "Windows Error Reporting Service" to MANUAL using Services Manager to prevent Windows 10 from sending error and diagnostic information to Microsoft.STEP 8:
Also set "Connected User Experiences and Telemetry", "Diagnostic Tracking Service" and "dmwappushsvc" services to MANUAL or DISABLED in Services Manager to turn off telemetry and data collection in Windows 10.
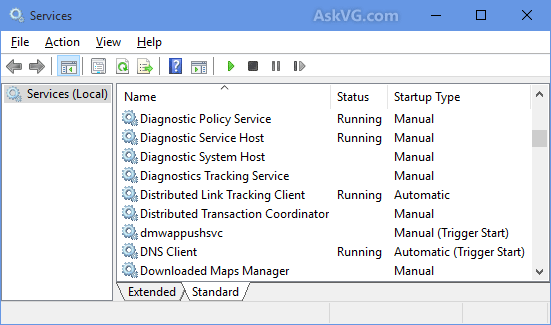
Check out following tutorial to learn how to configure Windows 10 services using Services Manager:
Beginner's Guide to Configure Windows 10 Services
Also check out following tutorial to disable secret "Customer Experience Improvement Program" (CEIP) which automatically collects and sends usage data to Microsoft:STEP 9:
[Tip] Disable "Customer Experience Improvement Program" (CEIP) in Windows

That's it guys. After customizing all these settings, you should not be worried about privacy issues in Windows 10. You are good to go.=== === === === === === === === ===
Comments
Post a Comment