
How to create a UEFI bootable USB flash drive for install Windows 8 / Server 2012


How to create a UEFI bootable USB flash drive for install Windows 8 / Server 2012

In this article we will discuss how to create special UEFI USB flash boot drive (disk for the further Windows 8 or Windows Server 2012 installation on equipment in native UEFI mode).
Boot flash drive with Windows 8 which was created in a standard way can’t be used for install the OS on a computer with UEFI. This flash drive is defined by OS however the boot from it will be impossible. The problem is that most utilities which create boot flash drives (including those created with a help ofWindows 7 USB\DVD Download tool) format device in NTFS file system. UEFI systems do not support booting from the media with NTFS or exFat file system, such systems are loaded only from the media, formatted in FAT32.
create UEFI bootable USB flash for windows 8
That`s why we need to create boot disk with FAT32 and copy Windows installation package on it.
What will we need for UEFI boot flash drive creation?
  • USB flash drive or disk which is no less than 4 Gb.
  • Windows 8 or Windows Server 2012 package on DVD or in ISO image.
  • The procedure is made with a help of diskpart utility on a computer with Windows 7/8/2008/2012
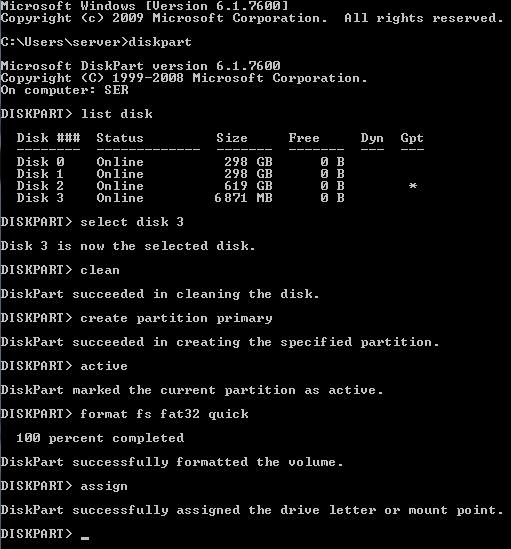
Insert flash drive in a free USB port (it`s better to disable all other USB storage devices to avoid confusion). Open command prompt with administrative privilege and perform the following commands:
  1. Run partition management utility – Diskpart
    1
    
    diskpart
  2. List the disks in system using command.
    1
    
    list disk
  3. Select disk which corresponds to your flash drive (you can define it by disk size)
    1
    
    select disk 3
  4. Check if you selected the right flash drive in the previous stage, because now we will delete all data from it.
    1
    
    clean
  5. Create a primary partition
    1
    
    create partition primary
  6. Select it
    1
    
    select partition 1
  7. Make it active
    1
    
    active
  8. Format flash drive in FAT32 file system (remember that in UEFI system boot is possible only from FAT32 not from NTFS)
    1
    
    format fs fat32 quick
  9. Assign a  letter to the created disk
    1
    
    assign
  10. Quite from DiskPart
    1
    
    exit
use diskpart to create uefi boot drive
Then we need to copy Windows 8 x64 installation package files on a boot flash drive which we created. To do so we should mount disk with Windows 8 image (lets assumed that it is J: drive and letter signed for flash it is H:) lets copy its content to a flash drive with a help of xcopy command.
1
xcopy J:\* H:\ /s /e
Tip. If you create a bootable USB flash drive UEFI for 64-bit Windows Vista SP1, Windows 7 or Windows Server 2008 R2 flash drive you should create EFI directory on a flash drive and copy boot folder in it.
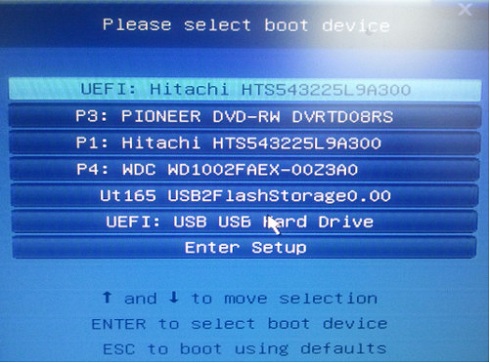
Now, using this media, you can install Windows 8 in UEFI mode. Don’t forget to disable Secure Boot in system boot parameters (in UEFI – ex BIOS) before installation start. After completion of installation Windows Security boot can be enabled.

Comments

Popular posts from this blog

sxhkd volume andbrightness config for dwm on void

xbps-install  sxhkd ------------ mkdir .config/sxhkd cd .config/sxhkd nano/vim sxhkdrc -------------------------------- XF86AudioRaiseVolume         amixer -c 1 -- sset Master 2db+ XF86AudioLowerVolume         amixer -c 1 -- sset Master 2db- XF86AudioMute         amixer -c 1 -- sset Master toggle alt + shift + Escape         pkill -USR1 -x sxhkd XF86MonBrightnessUp          xbacklight -inc 20 XF86MonBrightnessDown          xbacklight -dec 20 ------------------------------------------------------------- amixer -c card_no -- sset Interface volume run alsamixer to find card no and interface names xbps-install -S git git clone https://git.suckless.org/dwm xbps-install -S base-devel libX11-devel libXft-devel libXinerama-devel  vim config.mk # FREETYPEINC = ${X11INC}/freetype2 #comment for non-bsd make clean install   cp config.def.h config.h vim config.h xbps-install -S font-symbola #for emoji on statusbar support     void audio config xbps-i

Hidden Wiki

Welcome to The Hidden Wiki New hidden wiki url 2015 http://zqktlwi4fecvo6ri.onion Add it to bookmarks and spread it!!! Editor's picks Bored? Pick a random page from the article index and replace one of these slots with it. The Matrix - Very nice to read. How to Exit the Matrix - Learn how to Protect yourself and your rights, online and off. Verifying PGP signatures - A short and simple how-to guide. In Praise Of Hawala - Anonymous informal value transfer system. Volunteer Here are five different things that you can help us out with. Plunder other hidden service lists for links and place them here! File the SnapBBSIndex links wherever they go. Set external links to HTTPS where available, good certificate, and same content. Care to start recording onionland's history? Check out Onionland's Museum Perform Dead Services Duties. Introduction Points Ahmia.fi - Clearnet search engine for Tor Hidden Services (allows you

download office 2021 and activate

get office from here  https://tb.rg-adguard.net/public.php open powershell as admin (win+x and a ) type cmd  goto insall dir 1.         cd /d %ProgramFiles(x86)%\Microsoft Office\Office16 2.           cd /d %ProgramFiles%\Microsoft Office\Office16 try 1 or 2 depending on installation  install volume license  for /f %x in ('dir /b ..\root\Licenses16\ProPlus2021VL_KMS*.xrm-ms') do cscript ospp.vbs /inslic:"..\root\Licenses16\%x" activate using kms cscript ospp.vbs /setprt:1688 cscript ospp.vbs /unpkey:6F7TH >nul cscript ospp.vbs /inpkey:FXYTK-NJJ8C-GB6DW-3DYQT-6F7TH cscript ospp.vbs /sethst:s8.uk.to cscript ospp.vbs /act Automatic script (windefender may block it) ------------------------------------------------------------------------------------------------------------------- @echo off title Activate Microsoft Office 2021 (ALL versions) for FREE - MSGuides.com&cls&echo =====================================================================================&