Limited Wi-Fi Access in Windows 8.1 – Troubleshooting
In this article we’ll try to find a solution to a common problem of Wi-Fi connection in Windows 8.1, namely, the limited Internet connectivity and self-disconnection from a Wi-Fi access point.
The problem shows up in the following:
Or this way:
You can run into the same problem while updating the Wi-Fi adapter driver. In both cases, any other devices (smartphones, computers, laptops) can connect to the access point and use the Internet without any problems (i. e. the problem is not in the access point).

If there are any Wi-Fi connectivity issues in Windows 8.1 and the system doesn’t see a Wi-Fi network, any problems with the Internet access via Wi-Fi occur or the Internet access is often lost, these steps in turn are worth following:
How to Delete a Wi-Fi Network Profile
It is likely that the settings of the Wi-Fi router and/or WEP/WPA2 have been changed, but the system tries to connect to the access point with the settings that are stored in Windows in the Wi-Fi network profile. Try to delete the existing Wi-Fi network profile (how to do it is described in the chapter: How to Delete a Wi-Fi Network Profile).
After you have deleted the profile, try to connect to the access point again and enter the password.
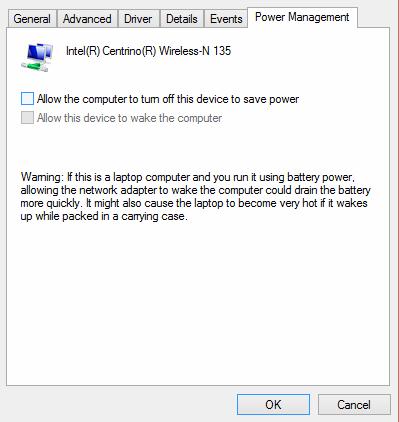
Power Save Mode of the Wi-Fi Adapter
Another possible reason of Win 8.1 to lose the connection to the Wi-Fi access point is the improper settings of the Power Save Mode of your Wi-Fi adapter. It makes Windows turn off the Wi-Fi adapter if it is not used for some time to save power. Check if this mode is enabled in the wireless device settings. Open the properties of the wireless connection and press the Configure button.

Go to the Power Management tab and make sure that the option Allow the computer to turn off this device to save power is not checked.
TCP/IP Stack Reset
You should also make sure that the TCP/IP stack with standard settings is used on this computer. To do it, reset the settings of the TCP/IP stack to default with netsh:
After the command has been run, restart the system, connect to the Wi-Fi access point and try to access the Internet.
Disabling TCP/IP Autotuning
In Windows Vista / Windows Server 2008 a new function, TCP Receive Window Auto-Tuning, was implemented to dynamically change the size of the acceptor’s memory buffer (due to this function, the maximum size of the window can be increased to 16MB). In theory, this feature should improve the network bandwidth and optimize the performance of the network subsystem. But in practice, autotuning of the Receive Window (RWIN) size results in many network issues. In Windows 8.1, TCP RWIN Auto-Tuning was preserved and sometimes the TCP autotuning means conflict with the settings of network hardware or firewalls (not supporting or prohibiting TCP Window scaling) causing package loss and the speed of the local network or the Internet decreases or even the access is lost completely.
So we recommend to disable the TCP/IP autotuning. To do it, open the command line with the administrator privileges and run the following commands one by one:
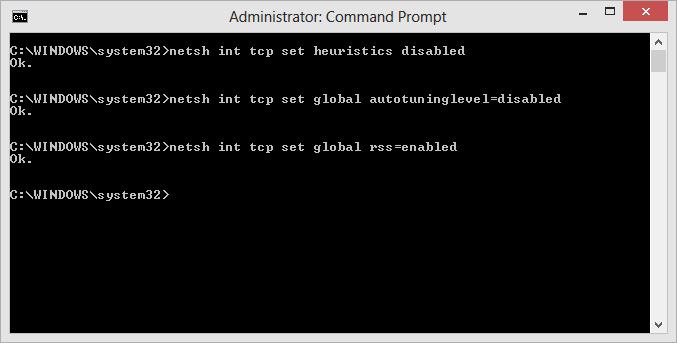
To check if the TCP/IP autotuning is disabled, use the following command:
After you run all the commands, restart your computer.
Updating the Wi-Fi Adapter Driver
Troubles with Wi-Fi adapter drivers can be another source of problems. Try to update the drivers to the latest version available on the manufacturer’s website. If the issue of the limited Internet connection is not solved this way, try to use the older version of the driver. See «
Rollback to the Older Version of the Wi-Fi Adapter Driver» for more info.
Rollback to the Older Version of the Wi-Fi Adapter Driver» for more info.
Rollback to the Older Version of the Wi-Fi Adapter Driver
Another effective technique is the rollback to the older version of the wireless adapter driver.
To roll back to the older version of the Wi-Fi adaptor driver in Windows 8:
- Open the Device Manager (devmgmt.msc)
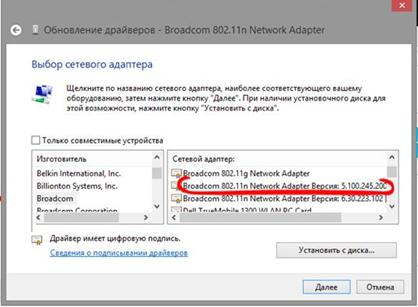
- Expand the branch Network Adapters and find your Wi-Fi card (Broadcom 802.11g in our example)

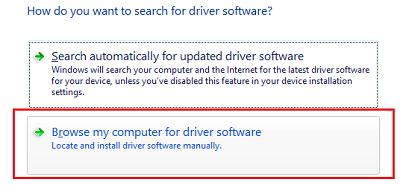
- Right-click your adapter and select Update Driver Software. In this window, click Browse my computer for driver software
- Uncheck Show compatible hardware. Then find Broadcom in the list, choose the older version of the driver and press Next (the less number corresponds to the older driver version). In our example the older version of the driver is Broadcom 802.11n Adapter version: 5.100.245.200 (the later one has the index 6.30.223.102)
- Now the installation of the older version of the Wi-Fi adapter driver is complete. You only have to restart your computer and check if the Wi-Fi connection is working. The Internet should work without the «Limited» status indication.
The specified methods should help to solve problems with the limited Wi-Fi connection in Windows 8.1. If you have found some other ways to handle the issue, please, describe it in the comments.
Comments
Post a Comment