these are just notes for study https://git-scm.com/book/en/v2
git configs location
1. [path]/etc/gitconfig =:> applied to every user2.=:> personal to u i.e $USER, --global edits this.~/.gitconfigor~/.config/git/config
3. .git/config :=> localt to current repo u r working. --local edits this. priotity of config is 3>2>1 as ususal in linux configgit config --list --show-originidentity setup::
$ git config --global user.name "John Doe"
$ git config --global user.email [email protected]
set editor
git config --global core.editor vim Your default branch name
git init makes default branch master . to set main as default branch
git config --global init.defaultBranch mainChecking Your Settings
$ git config --list$git config <key>
Getting a Git Repository
Initializing a Repository in an Existing Directory
$mkdir project
$cd project
cd to desired dir and run ::
$git init
This creates a new subdirectory named .git that contains all of your necessary repository files — a Git repository skeleton use git add to track fiels(i.e do version controlling) and do commit message.
$ git add *.py
$ git add README.md
$ git commit -m 'Initial project version'
Cloning an Existing Repository
$ git clonehttps://github.com/kzwkt/dellconfig
clones to $PWD/dellconfig $ git clone https://github.com/kzwkt/dellconfig testcloneclones to $PWD/testclone Recording Changes to the Repository
states of file in git :: Tracked(git knows about), Untracked (git is ignorant about)1. Untracked :: new files or files that exists in system i.e all normal files 2. tracked ::files added by git add filename. file will also be staged.
they can be unmodified, modified, or staged state.unmodified = after commiting staged files or fresh pull from repo files are unmodifiedmodified = tracked file gets editedstaged = ready to commit files. git add filename will set file as staged.git 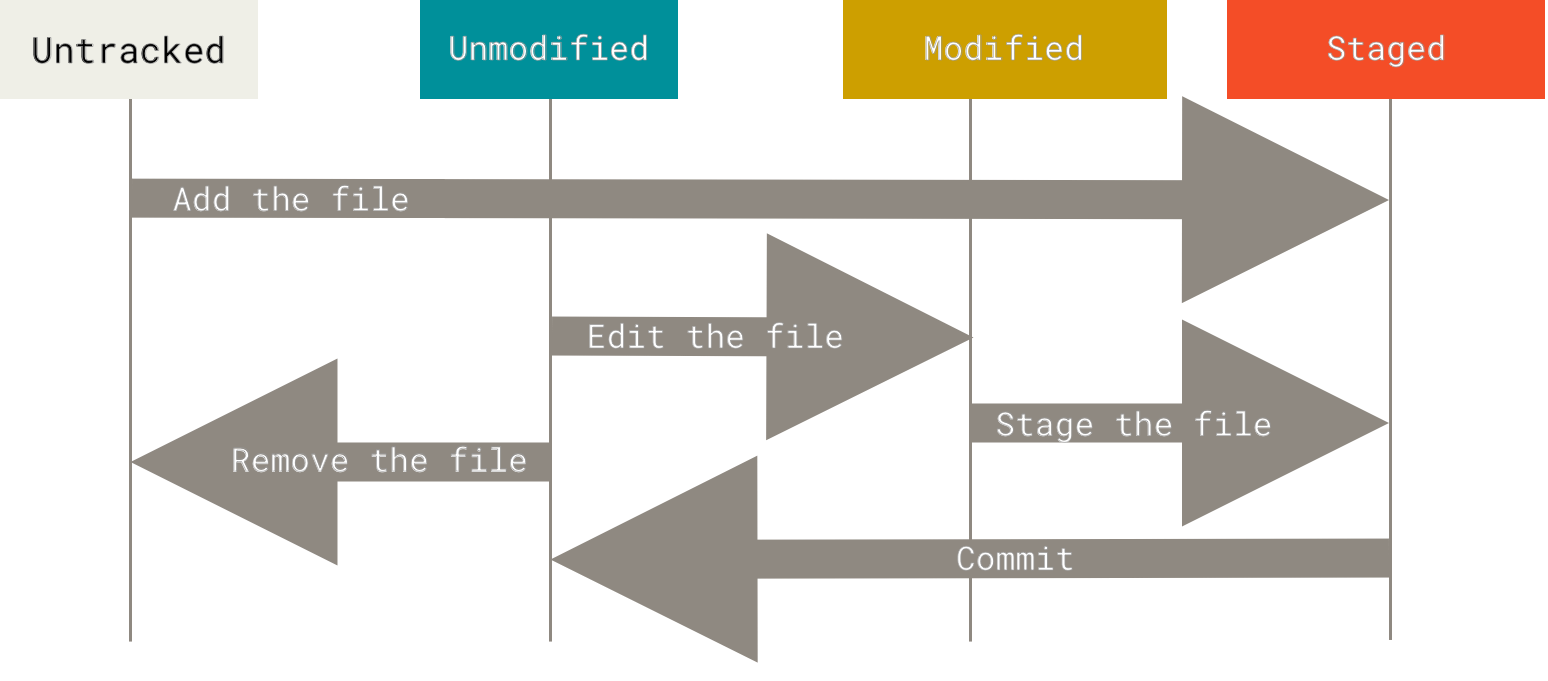
$git status
$git status -s #short status ??= untracked A=staged M=modifiedthis give status of filesIgnoring Files
create .gitignoreThe rules for the patterns you can put in the .gitignore file are as follows:
-
Blank lines or lines starting with
#are ignored. -
Standard glob patterns work, and will be applied recursively throughout the entire working tree.
-
You can start patterns with a forward slash (
/) to avoid recursivity. -
You can end patterns with a forward slash (
/) to specify a directory. -
You can negate a pattern by starting it with an exclamation point (
!).
Glob patterns are like simplified regular expressions that shells use.
An asterisk (*) matches zero or more characters; [abc] matches any character inside the brackets (in this case a, b, or c); a question mark (?) matches a single character; and brackets enclosing characters separated by a hyphen ([0-9]) matches any character between them (in this case 0 through 9).
You can also use two asterisks to match nested directories; a/**/z would match a/z, a/b/z, a/b/c/z, and so on.
example
#ignore any files ending in “.o” or “.a” *.[oa]
#ignore all files whose names end with a tilde (~) *~ see https://github.com/github/gitignore
Viewing Your Staged and Unstaged Changes
#to view excat changes that are unstaged $git diff #compares your staged changes to your last commit $git diff --staged #to see what you’ve staged so far (--staged and --cached are synonyms): $ git diff --cached #view in external tool
$git difftool #list available difftool $git difftool --tool-help
Committing Your Changes
$git commit#will launch $EDITOR i.e your fav editor or that set ingit config --global core.editor someeditor
$git commit -v#commit with diff changes$git commit -m"some commit message"
Every time you perform a commit, you’re recording a snapshot of your project that you canrevert to or compare to later. all staged state files are commited other are left as is.after commit you can see in git status Your branch is ahead of 'origin/master' by 1 commit.
Skipping the Staging Area
a option to the git commit command makes Git automatically stage every file that is already tracked before doing the commit, letting you skip the git add part: $ git commit -a -m 'Add new benchmarks' Removing Files
git rmcommand tracked files (more accurately, remove it from your staging area) and then
commit and also removes the file from your working directory so you don’t see it as an untracked
file the next time around.
remove from staging
$ git rm --cached READMEu can use glob patterns$ git rm log/\*.log$ git rm \*~ Moving Files
$ git mv file_from file_toHowever, this is equivalent to running something like this:
$ mv README.md README
$ git rm README.md
$ git add README
Git figures out that it’s a rename implicitly, so it doesn’t matter if you rename a file thatway or with the mv command.The only real difference is that git mv is one command instead of three Viewing the Commit History
$ git logshows all commit in reverse chronological order i.e recent first $ git log -p -2 shows last 2 commits with diff$ git log --stat git log --pretty=onelinegit log --pretty=format:"%h - %an, %ar : %s" git log --since=2.weeksgit log -S function_name git log -- path/to/filegit log --pretty="%h - %s" --author='Junio C Hamano' --since="2008-10-01" --before="2008-11-01" --no-merges -- t/
| Specifier | Description of Output |
|---|---|
|
Commit hash |
|
Abbreviated commit hash |
|
Tree hash |
|
Abbreviated tree hash |
|
Parent hashes |
|
Abbreviated parent hashes |
|
Author name |
|
Author email |
|
Author date (format respects the --date=option) |
|
Author date, relative |
|
Committer name |
|
Committer email |
|
Committer date |
|
Committer date, relative |
|
Subject |
Undoing Things
git commit --amendIf you want to redo commit, make the additional changes you forgot, stage them, and commitagain using the --amend option ex::
$ git commit -m 'Initial commit'
$ git add forgotten_file
$ git commit --amend
You end up with a single commit — the second commit replaces the results of the first.
Unstaging a Staged File
The git status command reminds you: after staging file using git add xx (use "git reset HEAD <file>..." to unstage) $ git reset HEAD CONTRIBUTING.mdUnmodifying a Modified File
(use "git checkout -- <file>..." to discard changes in working directory)$ git checkout -- CONTRIBUTING.md
Any local changes you made to that file are gone — Git just replaced that file with the laststaged or committed version. Undoing things with git restore
git restore.It’s basically an alternative to git reset for git >Unstaging a Staged File with git restore
(use "git restore --staged <file>..." to unstage)$ git restore --staged CONTRIBUTING.mdUnmodifying a Modified File with git restore
(use "git restore <file>..." to discard changes in working directory)$ git restore CONTRIBUTING.md Working with Remotes
Showing Your Remotes
git remote show shortname gir remote -vfull repo with url and shortnameIf you have more than one remote, the command lists them all. Adding Remote Repositories
git clonecommand implicitly adds theoriginremote for you
run git remote add <shortname> <url>: $ git remote add pb https://github.com/paulboone/ticgit you can run
git fetch <shortname>$ git fetch pb Fetching and Pulling from Your Remotes
$ git fetch <remote>git fetch command only downloads the data to your local repository — it doesn’t automatically merge it with any of your work or modify what you’re currently working on.You have to merge it manually into your work when you’re ready. you can use the git pull command to automatically fetch and then merge that remote branch into your current branch
Pushing to Your Remotes
git push <remote> <branch>
$ git push origin master You’ll have to fetch first and incorporate it into yours before you’ll be allowed to push
Inspecting a Remote
git remote show <remote>
$ git remote show originRenaming and Removing Remotes
$ git remote rename pb paulthis changes all your remote-tracking branch names, too.What used to be referenced atpb/master is now at paul/master. to remove remote git remote remove or git remote rm:
$ git remote remove paulOnce you delete the reference to a remote this way, all remote-tracking branches and configuration settings associated with that remote are also deleted. Tagging
used to mark releasesListing Your Tags
$ git tag$ git tag -l "v1.8.5*"Git supports two types of tags: lightweight and annotated.
A lightweight tag is very much like a branch that doesn’t change — it’s just a pointer to a specific commit.
Annotated tags, however, are stored as full objects in the Git database. They’re checksummed; contain the tagger name, email, and date; have a tagging message; and can be signed and verified with GNU Privacy Guard (GPG).
Annotated Tags
git tag -a v1.4 -m "my version 1.4"The-mspecifies a tagging message, opens $EDI$ git tag v1.4-lwTOR if unspecified .
You can see the tag data along with the commit that was tagged by using the git show command:
$ git show v1.4Lightweight Tags
To create a lightweight tag, don’t supply any of the -a, -s, or -m options, just provide a tag name:$ git tag v1.4-lw$ git show v1.4-lwTagging Later
Suppose your commit history looks like this:
$ git log --pretty=oneline9fceb02d0ae598e95dc970b74767f19372d61af8 Update rakefileTo tag that commit, you specify the commit checksum (or part of it) at the end of the command: $ git tag -a v1.2 9fceb02Sharing Tags
git push origin <tagname>
$ git push origin v1.5
$ git push origin --tags pushes all tags when someone else clones or pulls from your repository, they will get all your tags as well.git push <remote> --follow-tags only annotated tags will be pushed to the remote. Deleting Tags
$ git tag -d v1.4-lwThe first variation is git push <remote> :refs/tags/<tagname>:
$ git push origin :refs/tags/v1.4-lwsecond method $ git push origin --delete <tagname>Checking out Tags
$ git checkout v2.0.0this puts your repository in “detached HEAD” state, which has some ill side effects:In “detached HEAD” state, if you make changes and then create a commit, the tag will stay the same, but your new commit won’t belong to any branch and will be unreachable, except by the exact commit hash. Thus, if you need to make changes — say you’re fixing a bug on an older version, for instance — you will generally want to create a branch:
$ git checkout -b version2 v2.0.0
Switched to a new branch 'version2'
Aliases
$ git config --global alias.co checkout
$ git config --global alias.br branch
$ git config --global alias.ci commit
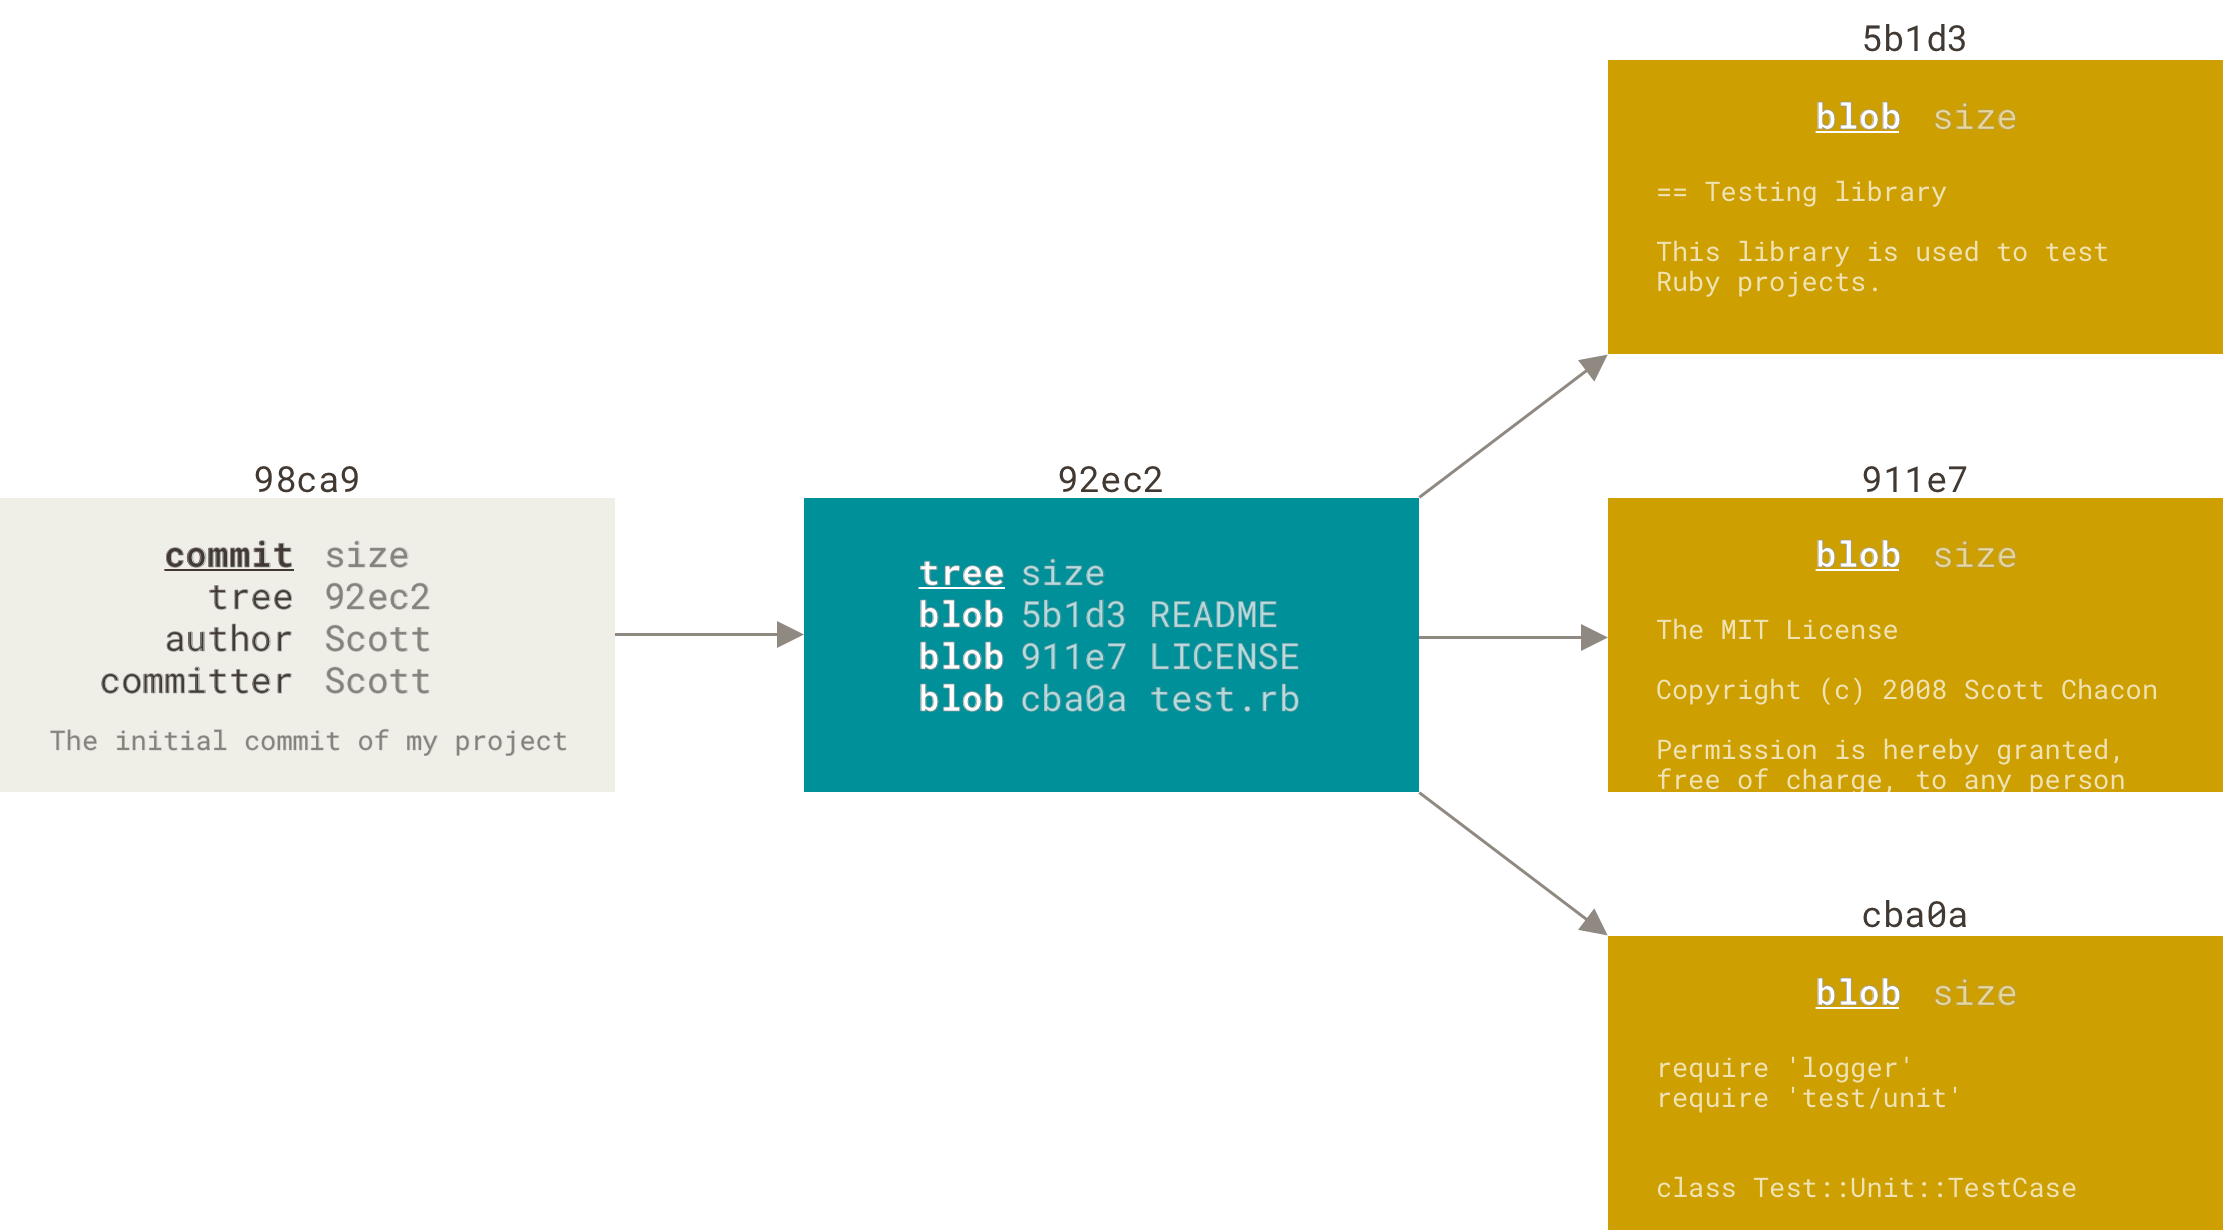
$ git config --global alias.st statusfor example, instead of typing git commit, you just need to type git ci. git config --global alias.unstage 'reset HEAD --'$ git unstage fileA $ git config --global alias.last 'log -1 HEAD'$ git last external command with !$ git config --global alias.visual '!gitk' Git stores data as a series snapshots when you create the commit by running git commit, Git checksums each subdirectory (in this case, just the root project directory) and stores them as a tree object in the Git repository. Git then creates a commit object that has the metadata and a pointer to the root project tree so it can re-create that snapshot when needed. our Git repository now contains five objects: three blobs (each representing the contents of one of the three files), one tree that lists the contents of the directory and specifies which file names are stored as which blobs, and one commit with the pointer to that root tree and all the commit metadata.
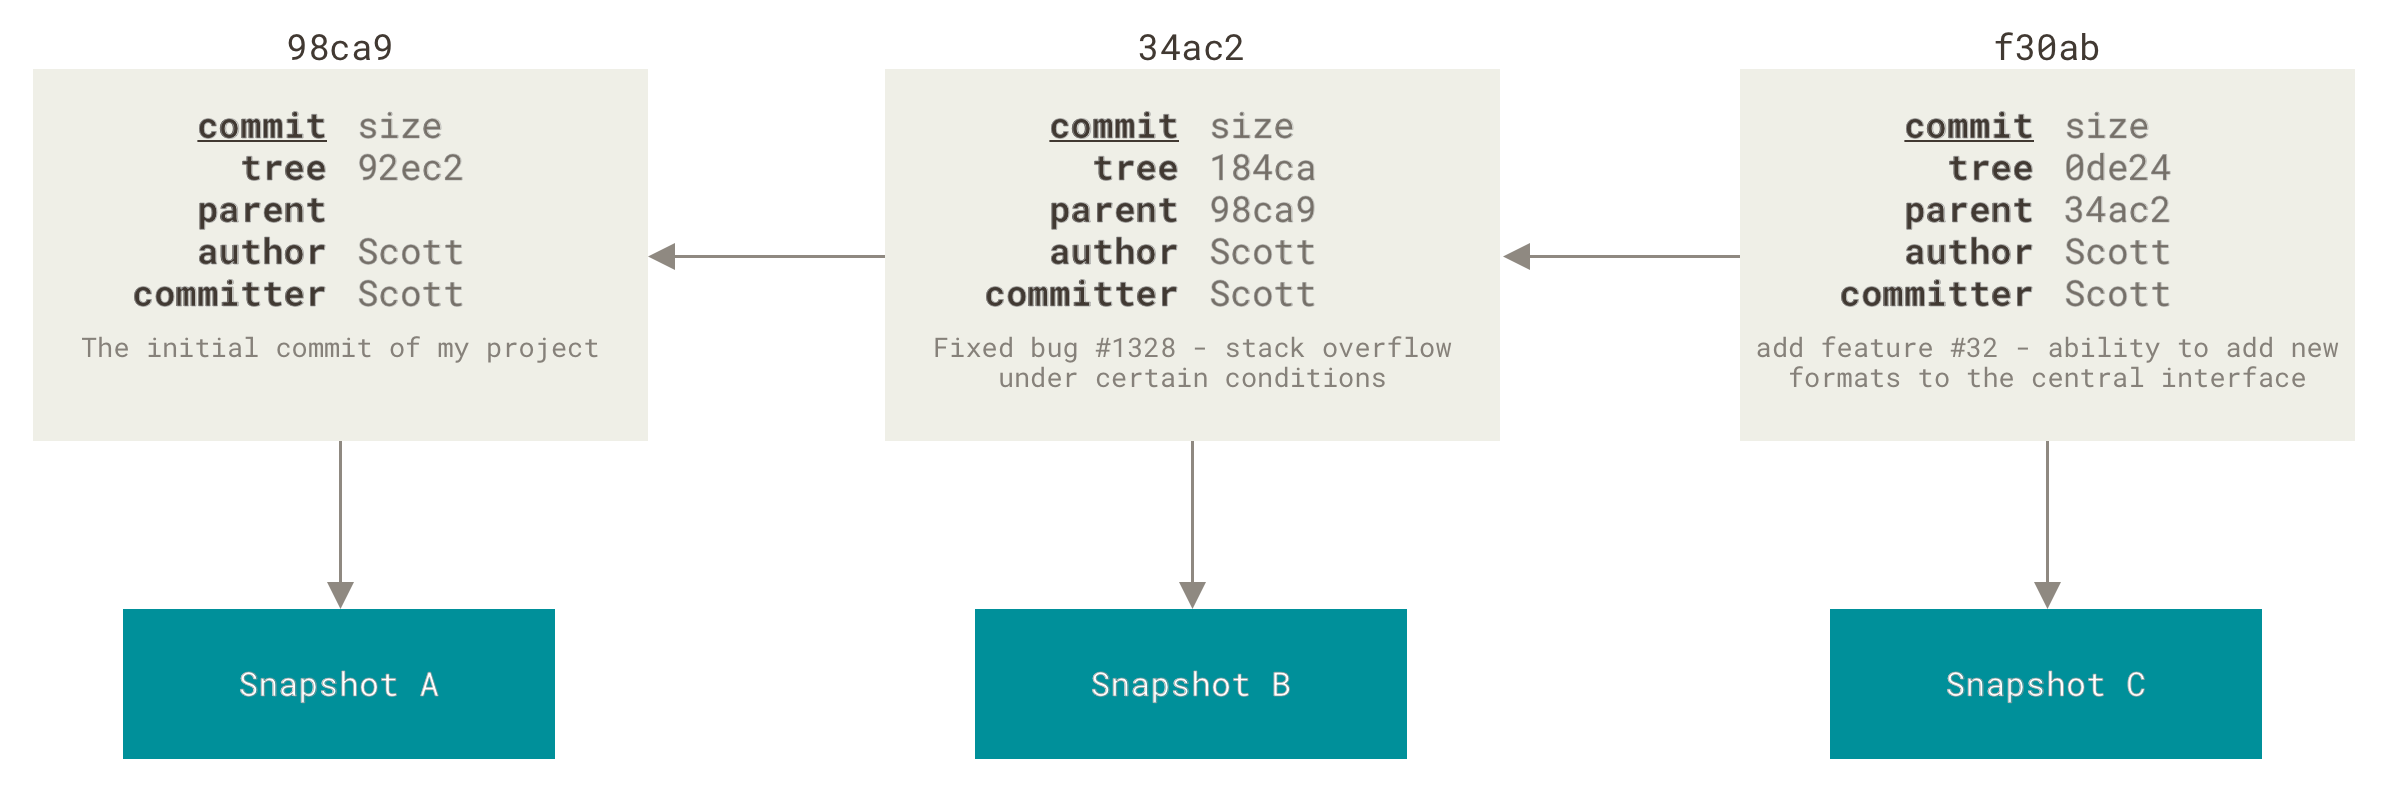
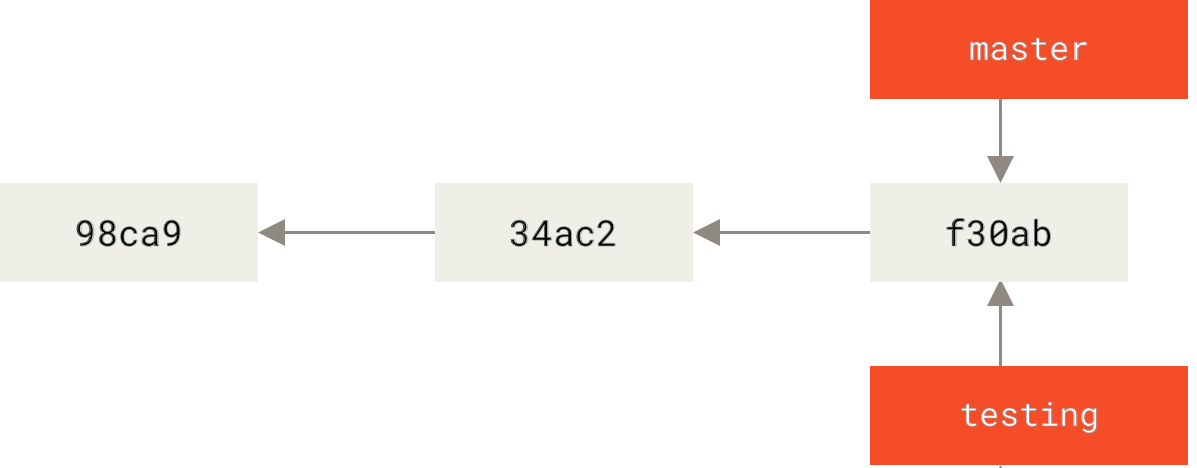
master.
As you start making commits, you’re given a master branch that points to the last commit you made.
Every time you commit, the master branch pointer moves forward automatically. 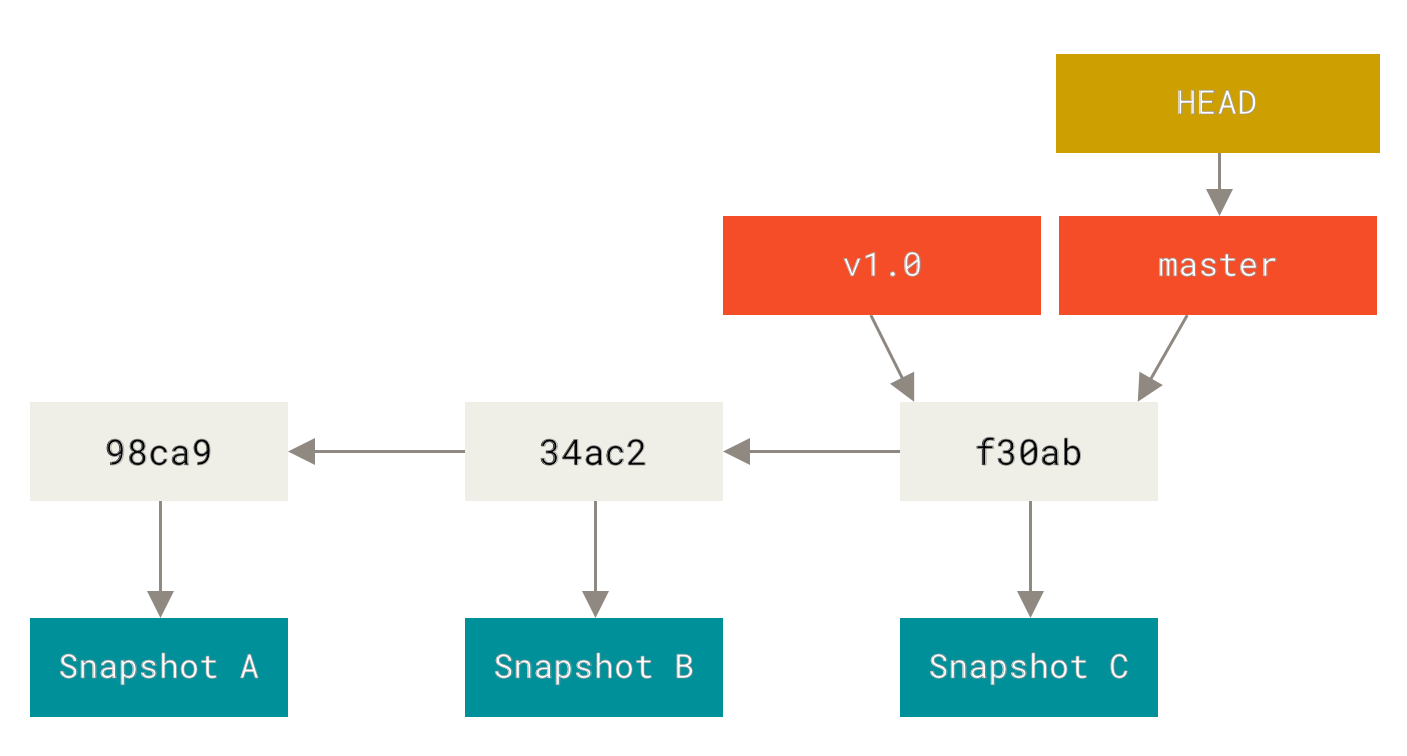
Creating a New Branch
git branch testing
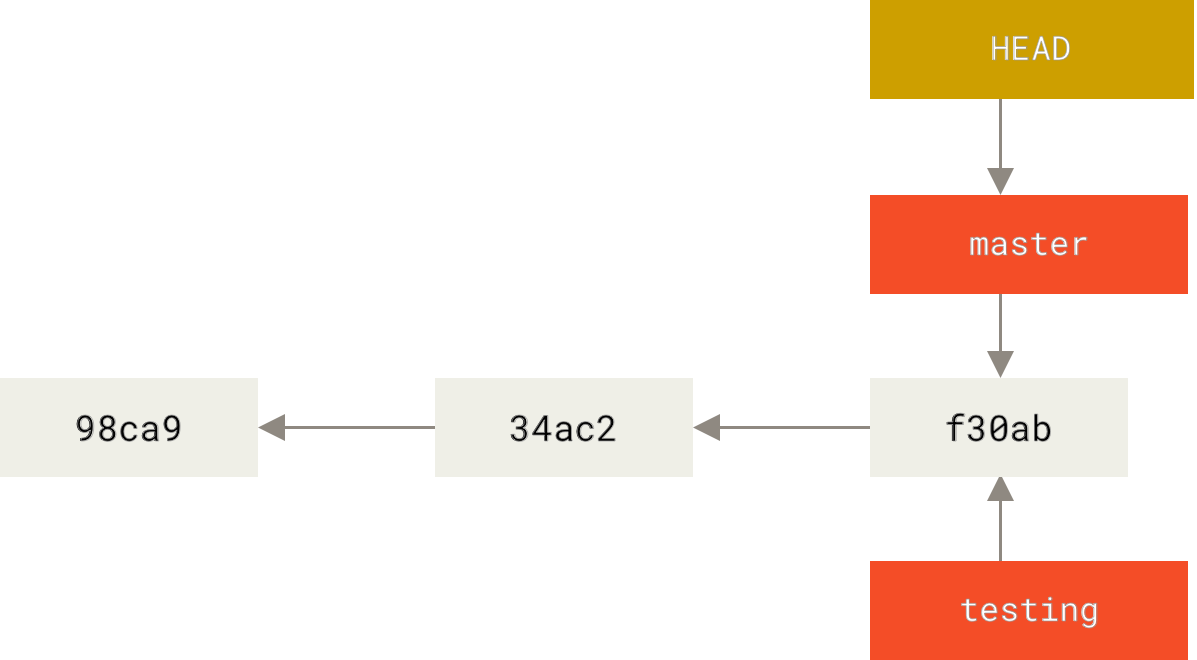
How does Git know what branch you’re currently on?
It keeps a special pointer called HEAD.
Note that this is a lot different than the concept of HEAD in other VCSs you may be used to, such as Subversion or CVS.
In Git, this is a pointer to the local branch you’re currently on.
In this case, you’re still on master.
The git branch command only created a new branch — it didn’t switch to that branch.
$ git log --oneline --decorateSwitching Branches
$ git checkout testingThis moves HEAD to point to the testing branch.
after you commit to testing branch only it moves forward
git log --oneline --decorate --graph --all
to show code changes in branchesBecause a branch in Git is actually a simple file that contains the 40 character SHA-1 checksum of the commit it points to, branches are cheap to create and destroy. Creating a new branch is as quick and simple as writing 41 bytes to a file (40 characters and a newline).
It’s typical to create a new branch and want to switch to that new
branch at the same time — this can be done in one operation with git checkout -b <newbranchname>.
for git >=2.23
-
Switch to an existing branch:
git switch testing-branch. -
Create a new branch and switch to it:
git switch -c new-branch. The-cflag stands for create, you can also use the full flag:--create. -
Return to your previously checked out branch:
git switch -.
Basic Branching and Merging
$ git checkout -b iss53$ vim index.html$ git commit -a -m 'Create new footer [issue 53]'$ git checkout master $ git checkout -b hotfix$ vim index.html
$ git commit -a -m 'Fix broken email address' $ git checkout master$ git merge hotfix$ git branch -d hotfixdelete hotfix branch after it is no need $ git checkout iss53 $ vim index.html$ git commit -a -m 'Finish the new footer [issue 53]' $ git checkout master$ git merge iss53This looks a bit different than the hotfix merge you did
earlier.
In this case, your development history has diverged from some older
point.
Because the commit on the branch you’re on isn’t a direct ancestor of
the branch you’re merging in, Git has to do some work.
In this case, Git does a simple three-way merge, using the two snapshots
pointed to by the branch tips and the common ancestor of the two.git branch -d iss53Basic Merge Conflicts
If your fix for issue #53 modified the same part of a file as thehotfixbranch,
you’ll get a merge conflict that looks something like this:
git merge iss53Auto-merging index.html
CONFLICT (content): Merge conflict in index.html
Automatic merge failed; fix conflicts and then commit the result. git statusAnything that has merge conflicts and hasn’t been resolved is listed as
unmerged.
Git adds standard conflict-resolution markers to the files that have
conflicts, so you can open them manually and resolve those conflicts.
Your file contains a section that looks something like this: <<<<<<< HEAD:index.html <div id="footer">contact : [email protected]</div> ======= <div id="footer"> please contact us at [email protected] </div> >>>>>>> iss53:index.html
In order to resolve the conflict, you have to either choose one side or the other or merge the contents yourself.
For instance, you might resolve this conflict by replacing the entire block with this:
<div id="footer">
please contact us at [email protected]
</div>
git addto mark as resolved and git commit git mergetool,for graphical resolution
git status
Branch Management
git branch
list branch
git branch -v
same with last commit
git branch --mergedsee which branch are merged in curret branch$ git branch --no-mergedThis shows your other branch. Because it contains work that isn’t merged in yet, trying to delete it withgit branch -dwill fail:
Changing a branch name
$ git branch --move bad-branch-name corrected-branch-name$ git push --set-upstream origin corrected-branch-name$ git branch --all$ git push origin --delete bad-branch-nameChanging the master branch name
$ git branch --move master main$ git push --set-upstream origin mainmain branch is present on the remote.
However, the old master branch is still present on the remote.
Other collaborators will continue to use the master branch as the base of their work, until you make some further changes.$ git push origin --delete masterRemote Branches
git ls-remote <remote>, or git remote show <remote> $ git push origin serverfixThis is a bit of a shortcut. Git automatically expands theserverfixbranchname out torefs/heads/serverfix:refs/heads/serverfix
If you’re using an HTTPS URL to push over, the Git server will ask you for your username and password for authentication. By default it will prompt you on the terminal for this information so the server can tell if you’re allowed to push.
If you don’t want to type it every single time you push, you can set up a “credential cache”.
The simplest is just to keep it in memory for a few minutes, which you can easily set up by running git config --global credential.helper cache.
Comments
Post a Comment